Azure Boards: Planning work items in BULK!
Planning multiple Azure DevOps Boards work items using Microsoft Excel
Planning work items in Azure Boards can be a tedious task. In this post I will be explaining how you can plan/create work items using Microsoft Excel. Using Excel you can easily add a large amount of items in an efficient manner.
Azure Boards: Planning work items in BULK using Microsoft Excel!
I have received the honors of taking up the role as Scrum Master within my team. And you know how the saying goes.. “With great power comes great responsibility”. Like planning a whole lot of Product Backlog Items (PBIs) and Work items in the backlog and future sprints! Luckily for me a colleague of mine showed me how to leverage Excel for this and after learning this trick I have been using it every day since. So I thought to myself why not pay it forward and write a blog post about it.
📋 Prerequisites
[✔] Azure DevOps Office Integration 2019
The Azure Devops Office Integration solution is required. Download link for the Azure DevOps Office Integration solution.
Work Item Query Language (WIQL)
In Azure DevOps Boards you can use the Work Item Query Language (WIQL) to list work items and its fields. You can throw as many WHERE filter conditions on the query as you like. I won’t be going into the language. If you like to do a deep dive, I’d suggest going through the documentation.
Welp, lets create our first query. You can go to the Queries page by going to Boards and click on the Queries button. See:

Once you are on the Queries page, click on + New query. This will take you to the Query Editor. This is where you can define your filters. At the top of the filters you can select the Type of query you want to create. For the Excel extension to work we need to create a query of the type Tree of work items. Select this type. Now that you have changed the query type a second filter box will display. Notice that the first box has the header Filters for top level work items and the bottom box Filters for linked work items. In the top level work item you can create a filter for your Feature(s). Based on your needs/requirements you can define the filters. For example if you have 2 Features you want to display you can get their ID’s and add an additional clause that checks for features with an ID in ##,##. You can add multiple values by comma separating them. In the bottom box you can filter for linked work items. These can be for example your Product Backlog Items, Work Items and/or Bugs. I can imagine that you or your team might have already created quite a lot of work items which have since been closed. Perhaps add a filter to only display PBIs and tasks which are in new/committed/to do state. Be creative!
An example in its simplest form:

Once you have your query defined you can run the query by pressing ▷ Run query. If your query is valid and returns any items the results should be displayed within the same page. Or in case you have a lot of results you can switch to the Results tab.

Congrats on creating your first query using the WIQL syntax. Don’t forget to Save query! We will need this query for the next step 😉
Shared folder instead. By doing that anyone within your team can run the query. Teamwork and all. 👍Azure DevOps Open in Excel extension
Before we can get started with opening our query in Excel we need to install the Azure DevOps Open in Excel extension by Microsoft DevLabs. This is a free extension that you can install from the Azure DevOps Marketplace. You can get to the marketplace by selecting the browse marketplace button at the top right of the Azure DevOps page:

Once you are in the marketplace just search for Azure DevOps Open in Excel which is an extension by Microsoft DevLabs. Click on the tile and it should take you to it’s page. On that page there will be a green button which displays Get it free. Press the button and install the extension for your desired Azure DevOps organization.
Easy peasy! If you now go back to the query that we have created earlier and run it you should see a new option. If you press the 3 vertical dots, next to the Export to CSV button at the top right of your query the option Open in Excel should display.

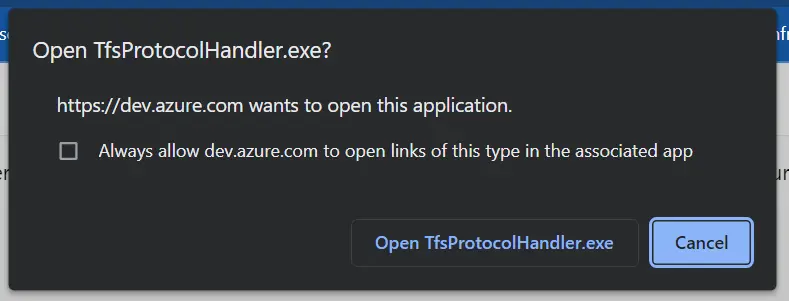
Open your query in Excel. The following pop-up will appear in your browser:

Click Open TfsProtocolHandler.exe and if all goes well Excel will open and the results of your work item query will appear in the grid.
Adding/Modifying work items
Now that you have your work items displayed in Excel lets see what we are looking at. First of all you should notice that the columns that are being listed are the same as your Query returned along with some additional Titles. (1, 2, 3..). The titles are based on the parent, child structure. In our case the Feature is populated in Title 1, the Product Backlog Item in Title 2 and the Tasks in Title 3. Make sure that if you are going to change any of the values that you do that in the correct cells. If you want to display additional Columns (e.g. the person to whom the work item is assigned) you can do that by either adding the column within the Azure DevOps query by going to Column options and add it to the column list over there. Or from within Excel. If you look at the top of your Excel sheet you should notice a Tab with the name Team. CLick on it and it will display some buttons which allow us to interact with Azure DevOps. In the case of adding additional columns you can do that by clicking on the button Choose Columns. This will display two lists: Available columns and Selected columns. Simply click on the columns you want to add and move them to the Selected columns. If you can’t find the column that you are looking for it can be the case that your Work item type is filtered on the wrong work item. Simply change this to right work item. Once you are done you can click on Add Required and the fields will be populated in your sheet.
This is good fun and all but I said we were going to bulk add/edit items. Not just looking at data in Excel! Editing items is pretty straight forward. Just modify the data as you see fit (but stick to allowed values and be careful to not mess anything up) and once you you are done click on the Publish button on the top left of the page. This will publish your changes to Azure DevOps. If you to pull changes from Azure DevOps as well you can do so by selecting the Refresh button next to it.
If you want to add a Task to an existing Product Backlog Item (PBI) you can select the row containing the PBI and click on the button Add Child. A new empty row will by inserted beneath your selection. For the Work Item Type select Task. Once you select the type of your work item some of the required fields will be autopopulated with a default value. For Title 3 give the name you want to give to your Task. Once you have given these values you can simply Publish again and you are done. Of course these are just the minimum amount of fields that needed to be populated. You could have given as much information as you need.

In this gif I showed how to create a new Task and link it directly as a child to an existing PBI. Notice that I didn’t populate all fields and that after publishing the item received an ID.
The cool thing about this is that you can use a lot of the features available in Excel to work with your data. And instead of adding just one item you could also just add a bunch at a time. You don’t need to publish your changes after each value that you modified. Perhaps you have a PBI with some Tasks that needs to be created for multiple sprints, like me! I want Product Backlog Item 7 and its work items created in sprint 1 to 5.

And there you have it. Product Backlog Item 7 and its childs are now all created from Sprint 1 til 5. Great! Saved me some time!
Conclusion
I hope you found this post useful and may find a use for this plugin as well. I think you should just play with the tool and try out a few things. The main purpose of this post was to spread the word.
Have fun planning and a very nice day! 👍